ScanNBill User Guide

ScanNBill उपयोगकर्ता मार्गदर्शिका

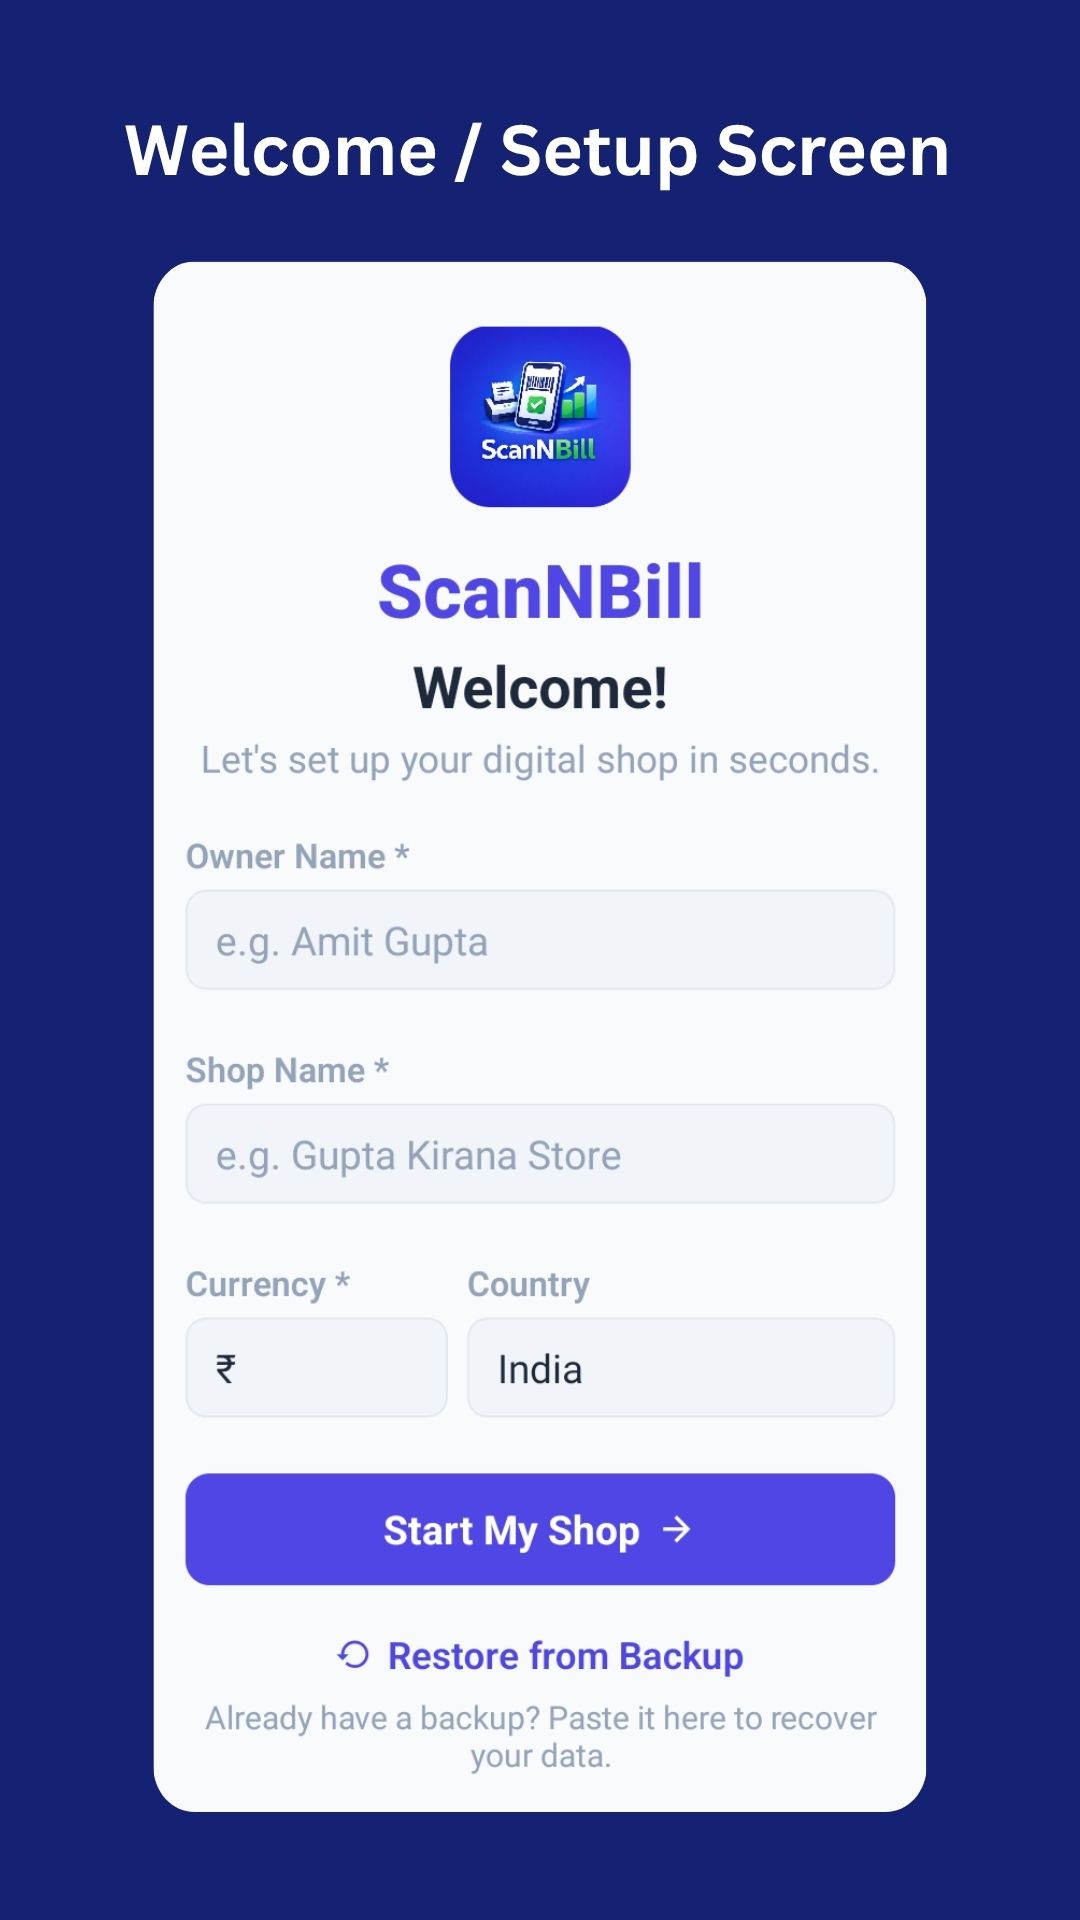
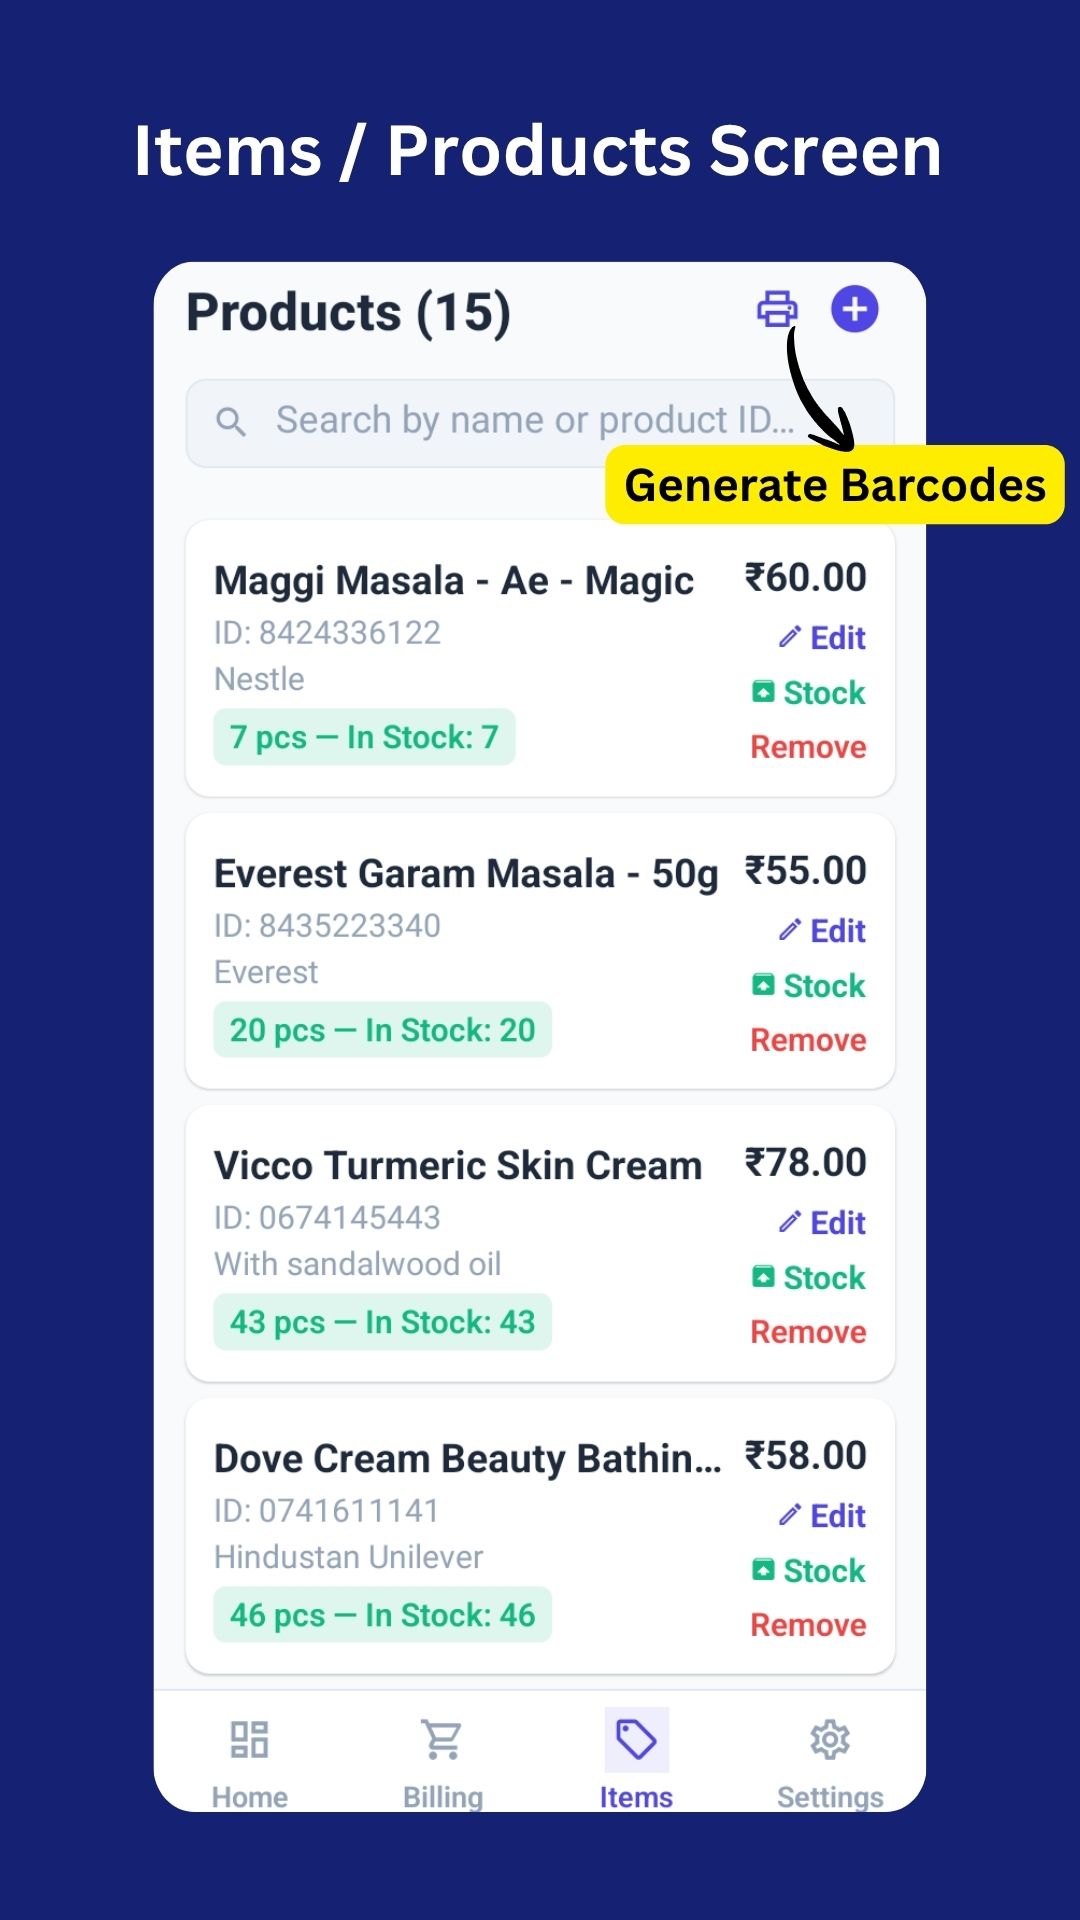
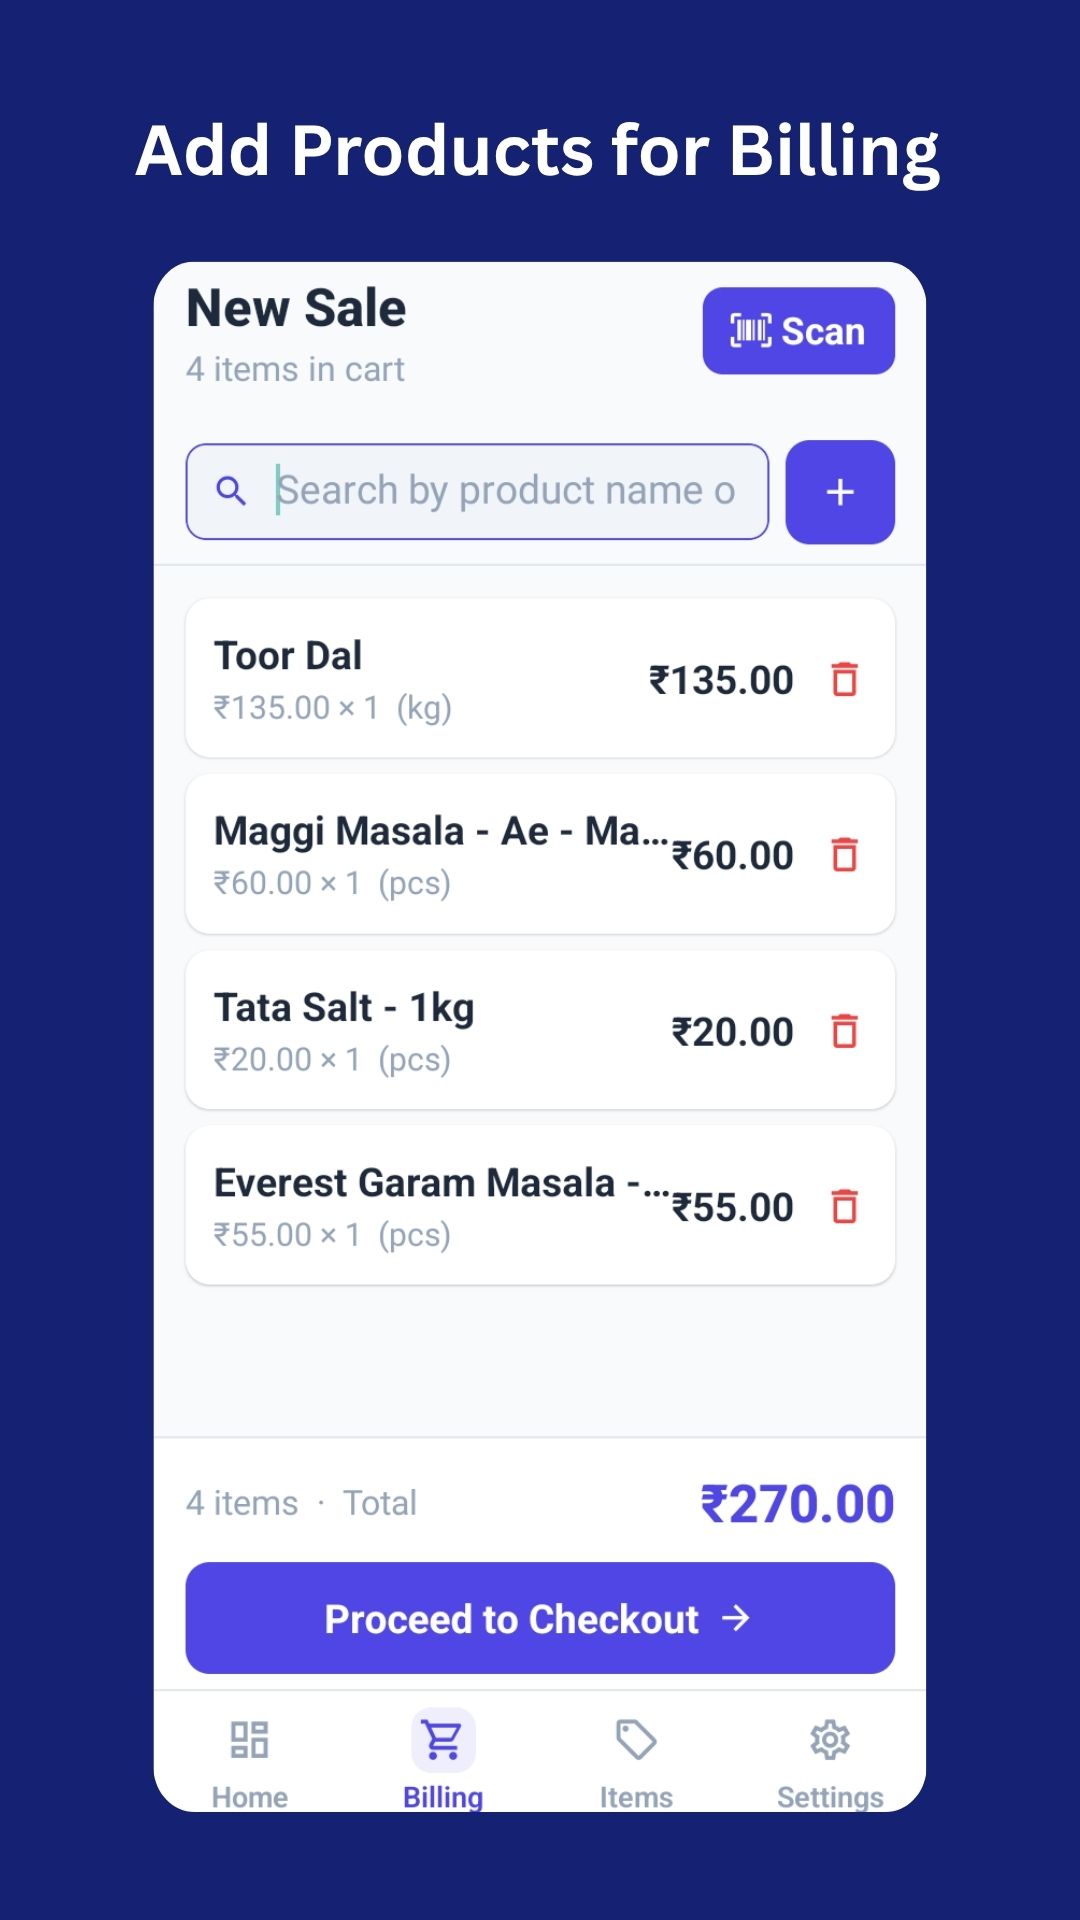
Your smartphone is now a full Point of Sale system. Learn how to set up, manage products, bill customers, and grow your business — step by step.

आपका स्मार्टफोन अब एक पूर्ण पॉइंट ऑफ सेल सिस्टम है। स्टोर सेट अप करना, उत्पाद जोड़ना, बिलिंग करना और अपना व्यवसाय बढ़ाना — सब कुछ स्टेप-बाय-स्टेप सीखें।

100% Privateपूरी तरह निजी Works Offlineऑफलाइन काम करता है No Hardware Neededकोई हार्डवेयर नहीं Data on Your Phone Onlyडेटा सिर्फ आपके फोन पर Perfect for Kirana Storesकिराना स्टोर के लिए परफेक्ट
No Server, Ever कोई सर्वर नहीं Your data never leaves your device. Zero cloud, zero tracking. आपका डेटा कभी भी आपके फ़ोन से बाहर नहीं जाता।
Instant & Lightweight तेज़ और हल्का No heavy PoS machines. Just your phone and ScanNBill. महंगी मशीन की ज़रूरत नहीं, बस आपका फोन काफी है।
100% Offline पूरी तरह ऑफलाइन Works without internet. No subscription. No monthly fees. इंटरनेट के बिना काम करता है। कोई मासिक शुल्क नहीं।
Completely Secure पूरी तरह सुरक्षित No accounts, no passwords, no data breach risk. कोई अकाउंट नहीं, कोई पासवर्ड नहीं, कोई डेटा खतरा नहीं।
Jump to Section सेक्शन पर जाएं

Getting Started शुरुआत कैसे करें First-time setup — takes less than a minute पहली बार सेटअप — एक मिनट से भी कम समय में

First Launch: When you open ScanNBill for the first time, you'll see a Welcome screen. Fill in your shop details to get started. This takes under 1 minute! पहली बार: जब आप ScanNBill पहली बार खोलते हैं, तो एक Welcome स्क्रीन दिखेगी। अपनी दुकान की जानकारी भरें और शुरू हो जाएं — इसमें 1 मिनट से भी कम लगता है!
Welcome Screen

Welcome screen on first launch

पहली बार खोलने पर वेलकम स्क्रीन

Already have a backup? On the setup screen, tap "Restore from Backup" to import your previous data instead of starting fresh. पहले से बैकअप है? सेटअप स्क्रीन पर "Restore from Backup" दबाएं और पुराना डेटा वापस लाएं।

Features Overview सुविधाओं का अवलोकन

Barcode Generator

बारकोड जेनरेटर

Auto-generates a unique barcode for every product you add.

हर उत्पाद के लिए अपने आप यूनीक बारकोड बनता है।

Barcode Printing

बारकोड प्रिंटिंग

Print a PDF catalogue of all your product barcodes at once.

सभी उत्पादों के बारकोड एक PDF में प्रिंट करें।

Barcode Scanner

बारकोड स्कैनर

Use your phone's camera to scan and instantly add items to the cart.

फोन कैमरे से स्कैन करें और तुरंत कार्ट में जोड़ें।

Credit / Udhar

उधार बिक्री

Record credit sales, track who owes you, and collect payments.

उधार बिक्री दर्ज करें, किसका कितना बकाया है देखें।

Sales Dashboard

सेल्स डैशबोर्ड

See today's sales, total revenue, bills count and outstanding credits.

आज की बिक्री, कुल राजस्व, बिल और बकाया एक ही जगह देखें।

Inventory Tracking

इन्वेंट्री ट्रैकिंग

Track stock levels. Get warnings when items are low or out of stock.

स्टॉक ट्रैक करें। कम स्टॉक पर अलर्ट मिलेगा।

Invoice Sharing

इनवॉयस शेयरिंग

Generate and share PDF invoices via WhatsApp, email, or any app.

PDF इनवॉयस बनाएं और WhatsApp, ईमेल से शेयर करें।

Backup & Restore

बैकअप और रिस्टोर

Export all data as JSON. Import it back on any device anytime.

सारा डेटा JSON में एक्सपोर्ट करें। कभी भी किसी डिवाइस पर इम्पोर्ट करें।

Managing Products उत्पाद प्रबंधन Add, edit, restock, and organise your inventory उत्पाद जोड़ें, संपादित करें, स्टॉक अपडेट करें

Adding a New Product नया उत्पाद कैसे जोड़ें
Tap the Items tab at the bottom of the screen, then tap the plus icon at the top-right. स्क्रीन के नीचे Items टैब दबाएं, फिर ऊपर-दाईं ओर प्लस आइकन दबाएं।
  • 1
    Product Name (Required) उत्पाद का नाम (अनिवार्य)

    Enter a clear name, e.g., "Basmati Rice 1kg" or "Surf Excel 1kg".

    स्पष्ट नाम दर्ज करें, जैसे "बासमती चावल 1 किलो" या "सर्फ एक्सेल 1 किलो"।

  • 2
    Selling Price (Required) बिक्री मूल्य (अनिवार्य)

    Enter the price at which you sell this product, e.g., 75.00.

    वह कीमत दर्ज करें जिस पर आप यह उत्पाद बेचते हैं, जैसे 75.00।

  • 3
    Stock Quantity (Required) स्टॉक मात्रा (अनिवार्य)

    How many units do you currently have? E.g., 50. You can enter 0 if you're just registering the product now.

    अभी कितनी मात्रा है? जैसे 50। अगर अभी स्टॉक नहीं है तो 0 डालें।

  • 4
    Unit of Measurement माप की इकाई

    Choose from: pcs kg g L ml box bag dozen

    इनमें से चुनें: pcs kg g L ml box

  • 5
    Description (Optional) विवरण (वैकल्पिक)

    Add brand, variant, or any notes. E.g., "Premium quality, imported".

    ब्रांड, वेरिएंट या कोई नोट जोड़ें। जैसे "प्रीमियम क्वालिटी"।

  • 6
    Tap "Save Product" "Save Product" दबाएं

    The product is saved and a unique barcode ID is automatically assigned to it.

    उत्पाद सेव हो जाएगा और इसे एक यूनीक बारकोड ID अपने आप मिल जाएगी।

Editing a Product उत्पाद संपादित करें
  • 1
    Go to Items Tab Items टैब पर जाएं

    Find the product in your list. Use the search bar to quickly find it by name or product ID.

    उत्पाद लिस्ट में ढूंढें। नाम या ID से सर्च करें।

  • 2
    Tap "Edit" "Edit" दबाएं

    Tap the Edit button on the product card to open the edit form.

    प्रोडक्ट कार्ड पर Edit दबाएं।

  • 3
    Make Your Changes & Save बदलाव करें और सेव करें

    Update the name, price, stock, or unit. Tap "Update Product" when done.

    नाम, कीमत, स्टॉक या इकाई बदलें। "Update Product" दबाएं।

Adjusting Stock (Restock / Reduce) स्टॉक एडजस्ट करें (जोड़ें / घटाएं)
Use this when new stock arrives, or when items are damaged/stolen and need to be removed from inventory — without creating a sale. जब नया माल आए, या सामान टूट जाए/चोरी हो जाए — बिना कोई बिक्री बनाए स्टॉक अपडेट करने के लिए इस विकल्प का उपयोग करें।
  • 1
    Find the product in Items Tab Items टैब में उत्पाद ढूंढें

    Tap the Stock button on the product.

    उत्पाद पर Stock बटन दबाएं।

  • 2
    Enter the Quantity Change मात्रा परिवर्तन दर्ज करें

    • To add stock: enter a positive number, e.g., 50
    • To reduce stock: enter a negative number, e.g., -5

    • स्टॉक जोड़ने के लिए: सकारात्मक संख्या दर्ज करें, जैसे 50
    • स्टॉक घटाने के लिए: ऋणात्मक संख्या दर्ज करें, जैसे -5

  • 3
    Tap "Apply Adjustment" "Apply Adjustment" दबाएं

    Stock is updated instantly. A confirmation shows the new stock level.

    स्टॉक तुरंत अपडेट हो जाएगा और नया स्टॉक लेवल दिखेगा।

Removing a Product उत्पाद हटाना
Removing a product is permanent and cannot be undone. Past sales records that included this product are not affected. उत्पाद हटाना स्थायी है और इसे वापस नहीं किया जा सकता। पिछली बिक्री रिकॉर्ड पर कोई असर नहीं पड़ेगा।

On the product card in the Items tab, tap Remove. Confirm the deletion in the prompt that appears. Items टैब में प्रोडक्ट कार्ड पर Remove दबाएं। पुष्टि डायलॉग में OK करें।

Barcodes & Printing बारकोड और प्रिंटिंग Understand how ScanNBill barcodes work ScanNBill बारकोड कैसे काम करते हैं

Important: ScanNBill can ONLY scan barcodes it has generated itself. महत्वपूर्ण: ScanNBill केवल वही बारकोड स्कैन कर सकता है जो उसने खुद बनाए हों।

It will not recognise the original barcodes printed on product packaging (like the ones on biscuit packets or shampoo bottles). You must print and stick ScanNBill's own barcode stickers on your products.

यह उत्पाद की पैकेजिंग पर छपे मूल बारकोड (जैसे बिस्किट पैकेट या शैम्पू बोतल पर) को नहीं पहचानेगा। आपको ScanNBill के बारकोड स्टिकर प्रिंट करके उत्पादों पर लगाने होंगे।

How to Print All Barcodes सभी बारकोड कैसे प्रिंट करें
  • 1
    Go to the Items Tab Items टैब पर जाएं

    Make sure you have at least one product added.

    सुनिश्चित करें कि कम से कम एक उत्पाद जोड़ा गया हो।

  • 2
    Tap the Print Icon प्रिंट आइकन दबाएं

    Tap the printer icon at the top-right of the Items screen. A PDF will be generated with all your products — 3 barcodes per row.

    Items स्क्रीन के ऊपर-दाईं ओर प्रिंटर आइकन दबाएं। एक PDF बनेगी जिसमें सभी उत्पादों के बारकोड होंगे — हर पंक्ति में 3 बारकोड।

  • 3
    Share or Print the PDF PDF शेयर करें या प्रिंट करें

    The share sheet will open. Choose your printer, send via WhatsApp/email, or save to your phone to print later.

    शेयर शीट खुलेगी। अपना प्रिंटर चुनें, WhatsApp/ईमेल से भेजें, या फोन में सेव करें।

  • 4
    Cut & Stick the Barcodes बारकोड काटें और चिपकाएं

    Print on sticker paper or plain paper. Cut out each barcode and stick or tape it onto the product or its shelf.

    स्टिकर पेपर या सादे कागज पर प्रिंट करें। बारकोड काटें और उत्पाद या शेल्फ पर चिपकाएं।

Tip: Each barcode shows the product name, barcode lines, and price — everything a billing counter needs at a glance. टिप: हर बारकोड पर उत्पाद का नाम, बारकोड लाइनें और कीमत दिखती है।
Items Screen

Generate barcode catalogue PDF

बारकोड कैटलॉग का पीडीएफ बनाएं

Billing & Checkout बिलिंग और चेकआउट Create a sale using barcode scan or product search बारकोड स्कैन या सर्च से बिक्री बनाएं

Method 1: Scan Barcode to Add Items तरीका 1: बारकोड स्कैन करके आइटम जोड़ें
  • 1
    Go to Billing Tab Billing टैब पर जाएं

    Tap Billing in the bottom navigation bar.

    नीचे के नेविगेशन बार में Billing दबाएं।

  • 2
    Tap the "Scan" Button "Scan" बटन दबाएं

    The camera will open. A frame guide will appear on screen.

    कैमरा खुलेगा। स्क्रीन पर एक फ्रेम गाइड दिखेगी।

  • 3
    Point Camera at the Barcode बारकोड पर कैमरा लगाएं

    Align the barcode (the one you printed with ScanNBill) within the frame. The phone will vibrate and show the product name on success.

    बारकोड (जो आपने ScanNBill से प्रिंट किया है) को फ्रेम में लाएं। सफल स्कैन पर फोन वाइब्रेट करेगा और उत्पाद का नाम दिखेगा।

  • 4
    Keep Scanning More Items और आइटम स्कैन करते रहें

    Continue scanning more products. Each scan adds 1 unit of that product to the cart. Scan the same barcode again to add another unit.

    और उत्पाद स्कैन करते रहें। हर स्कैन से कार्ट में 1 यूनिट जुड़ती है। दोबारा स्कैन करने पर एक और यूनिट जुड़ेगी।

  • 5
    Close Camera कैमरा बंद करें

    Tap the ✕ button to close the scanner and review your cart.

    ✕ बटन दबाकर स्कैनर बंद करें और कार्ट देखें।

Method 2: Search Products to Add Items तरीका 2: सर्च करके आइटम जोड़ें

You can also add items without scanning — useful for products you haven't printed barcodes for yet, or for quick manual billing. आप बारकोड स्कैन किए बिना भी आइटम जोड़ सकते हैं — उन उत्पादों के लिए जिनके बारकोड अभी नहीं छपे हैं।

  • 1
    Use the Search Bar in Billing Billing में सर्च बार का उपयोग करें

    In the Billing tab, type a product name or its ID in the search bar. A dropdown list of matching products will appear.

    Billing टैब में सर्च बार में उत्पाद का नाम या ID टाइप करें। मिलते-जुलते उत्पादों की सूची दिखेगी।

  • 2
    Tap the Product to Add उत्पाद दबाएं जोड़ने के लिए

    Tap any product in the dropdown. It gets added to the cart instantly.

    ड्रॉपडाउन में कोई भी उत्पाद दबाएं। वह तुरंत कार्ट में जुड़ जाएगा।

Completing a Sale (Checkout) बिक्री पूरी करें (चेकआउट)
  • 1
    Review the Cart कार्ट की जांच करें

    See all items, quantities, and the total. Tap any item to edit its quantity or price for this bill only.

    सभी आइटम, मात्रा और कुल राशि देखें। किसी आइटम पर दबाकर इस बिल के लिए मात्रा या कीमत बदलें।

  • 2
    Tap "Proceed to Checkout" "Proceed to Checkout" दबाएं

    Review the order summary one final time.

    अंतिम बार ऑर्डर की जानकारी जांचें।

  • 3
    Apply Discount (Optional) छूट लागू करें (वैकल्पिक)

    Enter a discount amount in the "Discount Amount" field if applicable. The final total updates automatically.

    अगर छूट देनी हो तो "Discount Amount" फ़ील्ड में राशि दर्ज करें। अंतिम कुल अपने आप बदलेगा।

  • 4
    Confirm Payment भुगतान की पुष्टि करें

    Tap "Confirm Payment". The sale is recorded, stock is reduced automatically, and you're ready for the next customer!

    "Confirm Payment" दबाएं। बिक्री रिकॉर्ड होगी, स्टॉक अपने आप घटेगा, और अगले ग्राहक के लिए तैयार!

Billing Screen

Billing in action

बिलिंग प्रक्रिया

Checkout Screen

Cart with items ready for checkout

चेकआउट के लिए तैयार कार्ट

Credit Sales (Udhar) उधार बिक्री Record credit, track outstanding balances, collect payments उधार दर्ज करें, बकाया देखें, पैसे वसूलें

Recording a Credit Sale उधार बिक्री दर्ज करें
  • 1
    Add Items to Cart as Usual सामान्य तरीके से कार्ट में आइटम जोड़ें

    Scan or search for products and add them to the cart.

    उत्पाद स्कैन या सर्च करके कार्ट में जोड़ें।

  • 2
    Tap "Proceed to Checkout" → Enable Credit Toggle चेकआउट में "Record as Credit?" टॉगल चालू करें

    At checkout, toggle "Record as Credit?" to ON (it turns blue/indigo).

    चेकआउट में "Record as Credit?" टॉगल चालू करें (यह नीला/इंडिगो रंग में हो जाएगा)।

  • 3
    Enter Customer Name ग्राहक का नाम दर्ज करें

    Type the customer's name. If they have an existing balance, their name and outstanding amount will appear as a suggestion. Select it to auto-fill.

    ग्राहक का नाम टाइप करें। अगर उनका पहले से बकाया है, तो उनका नाम और बकाया राशि सुझाव में दिखेगी।

  • 4
    Tap "Confirm Credit Sale" "Confirm Credit Sale" दबाएं

    The sale is recorded as credit. The customer's outstanding balance is updated on the Dashboard.

    बिक्री उधार के रूप में दर्ज होगी। ग्राहक का बकाया डैशबोर्ड पर अपडेट होगा।

Collecting a Credit Payment उधार की वसूली करें
  • 1
    Go to Home (Dashboard) Tab Home (Dashboard) टैब पर जाएं

    Scroll down to see the Outstanding Credits section listing all customers who owe you.

    नीचे स्क्रॉल करके Outstanding Credits सेक्शन देखें जिसमें सभी उधारदार ग्राहक दिखेंगे।

  • 2
    Tap the Customer's Name ग्राहक का नाम दबाएं

    A settlement modal opens showing their outstanding balance.

    एक सेटलमेंट विंडो खुलेगी जिसमें उनका बकाया दिखेगा।

  • 3
    Choose "Collect" and Enter Amount "Collect" चुनें और राशि दर्ज करें

    Tap Collect, enter the amount received. Or tap "Full amount" to auto-fill the total outstanding.

    Collect दबाएं, प्राप्त राशि दर्ज करें। या "Full amount" दबाकर पूरा बकाया भरें।

  • 4
    Tap "Confirm Payment" "Confirm Payment" दबाएं

    The customer's balance is reduced. If fully paid, they disappear from the outstanding list.

    ग्राहक का बकाया कम होगा। पूरा भुगतान होने पर वे बकाया सूची से हट जाएंगे।

Writing Off a Debt (Maafi) उधार माफ करना
Writing off a debt removes it from records permanently. No cash is collected. Use this when you've decided to forgive a debt. उधार माफ करने से वह स्थायी रूप से रिकॉर्ड से हट जाता है। कोई नकद नहीं लिया जाता। इसका उपयोग तब करें जब आप उधार माफ करना चाहते हों।

Follow the same steps as "Collecting a Payment" above, but select the Write Off option instead. Enter the amount to forgive and confirm. ऊपर "उधार वसूली" के समान चरणों का पालन करें, लेकिन Write Off विकल्प चुनें। माफ की जाने वाली राशि दर्ज करें और पुष्टि करें।

Dashboard & Reports डैशबोर्ड और रिपोर्ट Track your shop's performance at a glance अपनी दुकान का प्रदर्शन एक नज़र में देखें

Today's Sales आज की बिक्री

Total revenue collected today (cash + credit). आज प्राप्त कुल राजस्व (नकद + उधार)।

Total Revenue कुल राजस्व

All-time or filtered revenue based on the date filter you select. चुने गए फ़िल्टर के अनुसार कुल राजस्व।

Outstanding Credit कुल बकाया

Total amount owed to you by all credit customers combined. सभी उधार ग्राहकों का कुल बकाया।

Total Bills कुल बिल

Number of transactions recorded in the selected period. चुने गए समय में दर्ज लेनदेन की संख्या।

Filtering Transactions by Date तारीख के अनुसार लेनदेन फ़िल्टर करें

Use the filter chips at the top of the Dashboard: डैशबोर्ड के ऊपर फ़िल्टर चिप्स का उपयोग करें:

All Timeसभी समय Todayआज This Weekइस सप्ताह Single Dateएक तारीख Date Rangeतारीख रेंज
Sharing an Invoice इनवॉयस शेयर करें
  • 1
    Tap Any Transaction in the Dashboard डैशबोर्ड में किसी भी लेनदेन पर दबाएं

    A detailed bill view opens with all items, prices, and totals.

    सभी आइटम, कीमतें और कुल के साथ विस्तृत बिल व्यू खुलेगा।

  • 2
    Tap "Share Invoice" "Share Invoice" दबाएं

    A PDF invoice is generated and the share sheet opens. Send via WhatsApp, email, Telegram, or save to phone.

    PDF इनवॉयस बनेगी और शेयर शीट खुलेगी। WhatsApp, ईमेल, Telegram से भेजें या फोन में सेव करें।

Editing or Deleting a Transaction लेनदेन संपादित या हटाएं

Tap any transaction → tap Edit to change items/quantities/prices, or Delete to remove it. Deleting a sale also restores the inventory stock that was reduced by that sale. किसी लेनदेन पर दबाएं → Edit दबाकर बदलाव करें, या Delete दबाकर हटाएं। बिक्री हटाने से उस बिक्री में घटा हुआ इन्वेंट्री स्टॉक वापस आ जाएगा

Backup & Restore बैकअप और रिस्टोर Keep your data safe — export, save, and import JSON backups अपना डेटा सुरक्षित रखें — JSON बैकअप एक्सपोर्ट और इम्पोर्ट करें

Why backup matters: ScanNBill stores all data only on your phone. If you uninstall the app, lose your phone, or switch devices, your data will be gone unless you have a backup. बैकअप क्यों जरूरी है: ScanNBill सारा डेटा सिर्फ आपके फोन में स्टोर करता है। अगर आप ऐप अनइंस्टॉल करें, फोन खो जाए, या डिवाइस बदलें — बैकअप के बिना डेटा चला जाएगा।
What is a JSON Backup? JSON बैकअप क्या है?

A JSON backup is a text file that contains all your shop data — products, sales history, credit balances, settings — saved in a structured format. It looks like this: एक JSON बैकअप एक टेक्स्ट फ़ाइल है जिसमें आपकी दुकान का सारा डेटा होता है — उत्पाद, बिक्री इतिहास, उधार बैलेंस, सेटिंग्स। यह इस तरह दिखता है:

{"version":2,"shopName":"Gupta Kirana","ownerName":"Amit Gupta","currencySymbol":"₹","products":[...],"sales":[...],"customers":[...]}

You don't need to understand what's in it — just save it and don't edit it. Think of it like a photograph of your entire shop data. इसमें क्या है यह समझने की जरूरत नहीं — बस इसे सेव करें और इसे बदलें नहीं। इसे अपने पूरे दुकान के डेटा की एक तस्वीर समझें।

How to Export / Create a Backup बैकअप कैसे बनाएं / एक्सपोर्ट करें
  • 1
    Go to Settings Tab Settings टैब पर जाएं

    Tap the Settings tab in the bottom navigation.

    नीचे नेविगेशन में Settings टैब दबाएं।

  • 2
    Scroll to "Data Backup & Restore" "Data Backup & Restore" तक स्क्रॉल करें

    Find the backup section with the cloud icon.

    क्लाउड आइकन वाला बैकअप सेक्शन ढूंढें।

  • 3
    Tap "Export Backup" "Export Backup" दबाएं

    The share sheet opens with your backup as a text/JSON message.

    आपके बैकअप के साथ शेयर शीट खुलेगी।

  • 4
    Save it Safely इसे सुरक्षित रूप से सेव करें

    Choose how to save: WhatsApp yourself, email to yourself, save to Google Drive, Dropbox, or copy the text to a note. Any of these work!

    सेव करने का तरीका चुनें: खुद को WhatsApp करें, ईमेल करें, Google Drive/Dropbox में सेव करें, या टेक्स्ट को नोट में कॉपी करें। कोई भी तरीका काम करेगा!

Recommended: Take a backup at least once a week, or after any big update to your products or after a busy sales day. सुझाव: सप्ताह में कम से कम एक बार, या उत्पादों में बड़े बदलाव के बाद बैकअप लें।
How to Restore from a Backup बैकअप से रिस्टोर कैसे करें
Warning: Restoring a backup will completely replace all current data. If you want to keep your current records, export them first before restoring. चेतावनी: बैकअप रिस्टोर करने से सारा मौजूदा डेटा बदल जाएगा। अगर मौजूदा डेटा रखना चाहते हैं, तो पहले उसका एक्सपोर्ट करें।
  • 1
    Find Your Saved Backup Text सेव किया हुआ बैकअप टेक्स्ट ढूंढें

    Open WhatsApp, email, Google Drive, or wherever you saved it. Long-press and select all the text, then copy it.

    WhatsApp, ईमेल, Google Drive — जहां भी सेव किया था वहां खोलें। सारा टेक्स्ट सेलेक्ट करके कॉपी करें।

  • 2
    Open ScanNBill → Settings → "Import & Restore" ScanNBill खोलें → Settings → "Import & Restore"

    Or on a fresh install, use the "Restore from Backup" link on the welcome setup screen.

    या नई इंस्टॉल पर वेलकम सेटअप स्क्रीन पर "Restore from Backup" लिंक का उपयोग करें।

  • 3
    Paste the Backup Text बैकअप टेक्स्ट पेस्ट करें

    Long-press the text area and tap "Paste" to paste your copied backup JSON.

    टेक्स्ट एरिया पर लंबे दबाएं और "Paste" दबाकर बैकअप JSON पेस्ट करें।

  • 4
    Tap "Import & Restore" → Confirm "Import & Restore" दबाएं → पुष्टि करें

    A confirmation shows the backup date and shop name. Tap "Restore" to complete the process. All your data is back!

    पुष्टि में बैकअप की तारीख और दुकान का नाम दिखेगा। "Restore" दबाएं। आपका सारा डेटा वापस आ जाएगा!

Switching or Upgrading Devices डिवाइस बदलना या अपग्रेड करना
  • 1
    On Old Device: Export Backup पुराने डिवाइस पर: बैकअप एक्सपोर्ट करें

    Go to Settings → Export Backup → Send the JSON text to yourself via email or WhatsApp.

    Settings → Export Backup → JSON टेक्स्ट खुद को ईमेल या WhatsApp से भेजें।

  • 2
    On New Device: Install ScanNBill नए डिवाइस पर: ScanNBill इंस्टॉल करें

    Install the app fresh on your new device.

    नए डिवाइस पर ऐप इंस्टॉल करें।

  • 3
    At Welcome Screen: Tap "Restore from Backup" वेलकम स्क्रीन पर: "Restore from Backup" दबाएं

    Paste your backup JSON and restore. Your shop is ready on the new device!

    बैकअप JSON पेस्ट करें और रिस्टोर करें। आपकी दुकान नए डिवाइस पर तैयार!

Settings सेटिंग्स Manage shop info, appearance, and data दुकान की जानकारी, दिखावट और डेटा प्रबंधित करें

Frequently Asked Questions अक्सर पूछे जाने वाले प्रश्न

Does ScanNBill need internet to work? क्या ScanNBill को काम करने के लिए इंटरनेट चाहिए?

No. ScanNBill works 100% offline. All data is stored on your phone using local storage. No internet connection is ever required for any feature — billing, scanning, reporting, or backup. नहीं। ScanNBill 100% ऑफलाइन काम करता है। सारा डेटा आपके फोन में स्थानीय स्टोरेज में सेव होता है। बिलिंग, स्कैनिंग, रिपोर्टिंग या बैकअप — किसी भी सुविधा के लिए इंटरनेट की कोई जरूरत नहीं।

Can I scan the barcode printed on product packaging? क्या मैं उत्पाद की पैकेजिंग पर छपे बारकोड को स्कैन कर सकता हूं?

No. ScanNBill's scanner only recognizes barcodes that were generated by ScanNBill itself. It will not recognize EAN/UPC barcodes on product packets. You need to print ScanNBill barcodes and attach them to your products. नहीं। ScanNBill का स्कैनर केवल वही बारकोड पहचानता है जो ScanNBill ने खुद बनाए हों। उत्पाद पैकेट पर EAN/UPC बारकोड नहीं पहचानेगा। आपको ScanNBill के बारकोड प्रिंट करके उत्पादों पर लगाने होंगे।

What happens if I uninstall the app? अगर मैं ऐप अनइंस्टॉल करूं तो क्या होगा?

All your data will be permanently deleted when you uninstall the app. Always export a backup before uninstalling. You can restore the backup on reinstallation using the "Restore from Backup" option. ऐप अनइंस्टॉल करने पर सारा डेटा स्थायी रूप से मिट जाएगा। अनइंस्टॉल करने से पहले हमेशा बैकअप एक्सपोर्ट करें। पुनः इंस्टॉल करने पर "Restore from Backup" से डेटा वापस ला सकते हैं।

Can multiple people use ScanNBill on the same shop? क्या एक ही दुकान के लिए कई लोग ScanNBill इस्तेमाल कर सकते हैं?

ScanNBill is designed for a single device per shop. Since all data is stored locally on each phone, there is no automatic sync between devices. You can manually share backups between devices, but real-time sync is not supported. ScanNBill एक दुकान के लिए एक डिवाइस के साथ काम करने के लिए बनाया गया है। सारा डेटा हर फोन में स्थानीय रूप से सेव होता है, इसलिए डिवाइसों के बीच कोई स्वचालित सिंक नहीं है। आप मैन्युअल रूप से बैकअप शेयर कर सकते हैं।

What does "Out of Stock" mean and can I still sell? "Out of Stock" का मतलब क्या है और क्या मैं फिर भी बेच सकता हूं?

When a product's stock quantity reaches 0, it shows "Out of Stock" in red. The app will prevent you from adding it to a bill until you restock it. Use the Stock adjustment feature to add new stock when it arrives. जब किसी उत्पाद का स्टॉक 0 हो जाता है, तो वह लाल रंग में "Out of Stock" दिखाता है। ऐप आपको उसे बिल में जोड़ने से रोकेगा जब तक आप स्टॉक नहीं जोड़ते। नया माल आने पर Stock adjustment से स्टॉक जोड़ें।

Is my data safe and private? क्या मेरा डेटा सुरक्षित और निजी है?

Absolutely. ScanNBill never connects to any server or cloud. Your shop data, sales, customer details, and financials stay exclusively on your device. There is zero data transmission to any third party — ever. बिल्कुल। ScanNBill कभी किसी सर्वर या क्लाउड से कनेक्ट नहीं होता। आपकी दुकान का डेटा, बिक्री, ग्राहक विवरण और वित्त केवल आपके डिवाइस पर रहता है। किसी भी तीसरे पक्ष को कोई डेटा नहीं भेजा जाता — कभी भी।

The camera doesn't open / barcode won't scan कैमरा नहीं खुलता / बारकोड स्कैन नहीं होता
  • Ensure you have granted ScanNBill camera permission in your phone's app settings.
  • सुनिश्चित करें कि आपने फोन सेटिंग में ScanNBill को कैमरा अनुमति दी है।
  • Hold the camera steady and close to the barcode — about 10–15 cm away.
  • कैमरे को बारकोड के करीब और स्थिर रखें — लगभग 10–15 सेमी की दूरी पर।
  • Make sure you're scanning a ScanNBill-generated barcode, not a manufacturer's barcode.
  • सुनिश्चित करें कि आप ScanNBill द्वारा बनाए गए बारकोड को स्कैन कर रहे हैं, निर्माता के बारकोड को नहीं।
  • Ensure the printed barcode is not blurry, torn, or too small to read.
  • सुनिश्चित करें कि प्रिंटेड बारकोड धुंधला, फटा हुआ या बहुत छोटा नहीं है।
  • Try in good lighting. Avoid scanning in dim light.
  • अच्छी रोशनी में स्कैन करें। कम रोशनी से बचें।
Can I change the currency symbol? क्या मैं मुद्रा चिन्ह बदल सकता हूं?

Yes! Go to Settings → Shop Information → Edit (✎) and change the currency symbol to anything you like — ₹, $, £, AED, etc. Up to 3 characters are supported. हां! Settings → Shop Information → Edit (✎) में जाएं और मुद्रा चिन्ह बदलें — ₹, $, £, AED, आदि। अधिकतम 3 अक्षर सपोर्ट हैं।